Friday, August 15, 2008

So HOT it's on Fire!


For several weeks, I've been following the Unplugged Project (also in my sidebar). Last week's theme of hot fell right in line with a project I had planned for this week's "ready for camp" theme.

A big part of camping is the campfire. How can you tell stories, sing songs or make s'mores without a campfire? We need fire-starters to get the fire going - especially if it rains (yes, for those of you who never participated in scouting, it is possible!)

In the past I have rolled up strips of newspaper, tied them with a wick and dipped them in wax. I've also tied the wick on a pine cone and dipped those as well. BUT I'd rather not have my kids dipping things in hot wax-even if it does fit the theme...

I came up with a much more kid-friendly version.

Materials:
  • paper egg carton with the top removed

  • dryer lint (optional)

  • braided wick (be sure this is NON metallic).

  • hot glue gun

  • microwavable soy wax melts

Instructions:

  • cut the wick into pieces about 2" long.

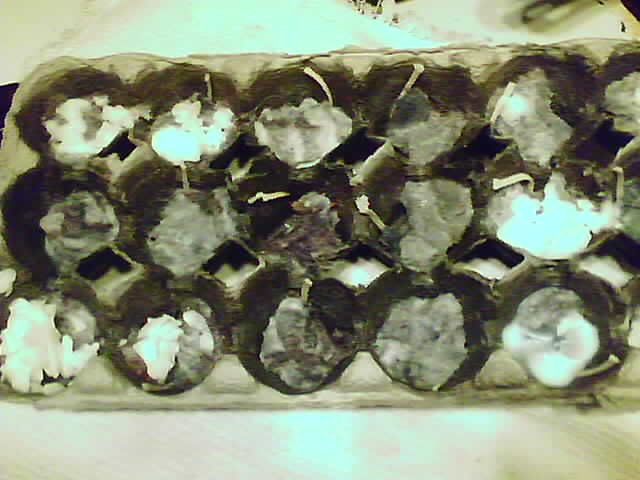
  • put a drop of hot glue in the center of each egg cup and place the end of the a wick in it (use a toothpick or pencil to push it in).

  • place a pinch of the lint in each cup. the wicks do not need to stay centered, but make sure the end is exposed so it can be lit at camp.

  • top of each cup with plenty of wax. Remember that the paper and lint will soak up the wax, so be generous.

  • place the whole thing in the microwave in High for 30 second intervals until all the wax is melted.

  • allow to cool.

  • once cooled, the fire-starters can be broken apart or kept together.

  • when you are ready to build your fire, add one or two with the kindling and light the wick.

Warnings:

  • the wax is hot when it comes out of the microwave and should only be handled by adults.

  • use this opportunity to remind the kids about fire safety.

  • when camping or buildings any fire, check all local regulations first and only light fires in approved places. NEVER light a campfire during a red flag warning.

  • ALWAYS be sure that your fire is out COMPLETELY before leaving it unattended.

Notes:

  • I'm not sure the wick is really necessary, or if the carton will light sufficiently on its own. I'll report back once I've tested them.

  • marshmallow Peeps are REALLY good when toasted on the campfire...

  • these are safe for use in your fireplace as well (assuming that your fireplace is in good working condition to begin with).
update- they work GREAT! no need for the wick either. the carton tended to ignite before the wick did anyway.

Thursday, August 14, 2008

Color Explosion

In the pre-vacation chaos that is my life this week, I opted for another easy peasy project. Ryan has been BEGGING me to get them "Color Explosion" paper & markers since we got a sample in some other Crayola product. I found them for $5 when I was out picking up stuff for our camping trip.

I guess it went over well, because Daddy sent me a text saying we need to buy more and all of the paper was used up when I got home (20 sheets/kid!).

(pictures comming)

Tuesday, August 12, 2008

Reading in the Wild


Spotted in the wild.. OK .. the kitchen. My eldest two involved in spontaneous cooperative reading! They both read to their "baby" brother (he'll be 2 in a matter of days!!!) but for the two of them to share a book like this... to share anything for that matter! Makes a mama proud!

Monday, August 11, 2008

solid+liquid=gas


we did a little non-toxic chemistry experiment. One that I do frequently when I clean, actually. the boys mixed baking soda and vinegar to see what would happen. while this is non-toxic, It can be messy, so we went outside in case of "explosion".


Instructions:


  • Using a funnel, put 1 Tbsp. baking soda in a latex balloon.

  • again using the funnel, pour 1C. white vinegar into a clean 20oz soda bottle.

  • place the opening of the balloon over the neck of the bottle while keeping the balloon itself to the side - keeping the baking soda in.

  • have your child keep one hand on the neck of the bottle and lift the balloon up with the other.

  • watch as the solid dissolves in the liquid and the reaction makes a gas that bubbles, fizzes and blows up the balloon!

Thursday, August 7, 2008

Disaster Ressurected


Last week, the boys attended the third week of Karate Camp. Camp is mornings only and they were missing their craft time with Dad. SO, I left their projects in my bedroom for Daddy to distribute AFTER Karate camp.
Well, #1 got up early one morning, went into my room and saw his painting kit and decided to help himself... He proceeded to break the tube of BLACK paint and get it on himself, the kitchen table, chairs, floor and 2 of my good bath towels.
Daddy cancelled all of our painting plans until further notice.
Once Dad regained composure, a few days later, they had another go at the painting. This is our camp painting area in the back yard. The table is a cheap ($10-ish) plastic one we've had for several years. It is also broken. So, they can get some sun and fresh air while keeping painting messes out of the house. Sesame Street plates and Halloween cups sold separately! The plates made great palettes and the paints peeled right off when dry!
I'll post better pictures of the finished pieces, but they are essentially coloring book pages printed on canvas. Each one came with a brush and a set of acrylics. Not bad for $2 (Christmas Tree Shop).

Wednesday, August 6, 2008

Up, Up and Away!


Yesterday, the boys learned about flight. I got a little book of papaer airplane paper - complete with folding instructions and cool stickers. Found that at the craft store too.. ($2 for 6 planes). This can certainly be done with whatever paper you have around - even recycle newspaper, magazines or junk mail! Experiment with different folds, and don't forget to decorate your planes! Daddy showed them how different folds made the planes do different things.

Tuesday, August 5, 2008

Recycled Crayons


I've seen this idea lots of places. take old broken crayons, peel the paper off and break them up even more. Put the broken pieces in a small tart or muffin tin. Bake at 200 F until melted. remove and allow to cool before removing your new rainbow crayons!


Hints:


  • freeze the crayons before breaking them up

  • use a silicone pan or grease the tin VERY well. DO NOT use a porous pan such as stone or cast iron

  • if you have a pan that fits in your toaster oven, it is easier to watch the wax melt.

  • Freeze the warm crayons to set them faster.

Edited to add- Check out these alphabet crayons! more tips in there on how to make great recycled crayons!